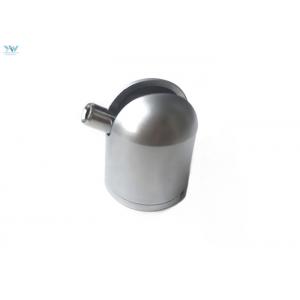
Brass Material Satin Silver Color Swivel Aircraft Cable Gripper / Picture Solo Hanger
This solo-hanger can be mounted on the wall or on the ceiling.
You therefore do not need a rail. It is also very suitable for mounting on sloping walls.
Wherever you hang up the solo-hanger, your wall decoration will remain straight and hang close to the wall.
Your wall or ceiling construction will determine how the solo hanger is fixed to the wall.
*Brick Walls - Wall Plug and Screw,
*Gyprock Walls - Wall Mate or Fix to a stud,
*Ceiling is usually fixed to a ceiling joist or other suitable material.
Features
*Works well on angled ceilings,it has a adjustable gripper inside.
*The solo Hanger Kit can be fixed to the ceiling and is great for hanging art or marketing messages in a shop front window.
Description
| 1. Material | Brass |
| 2. Size | Φ18*24mm |
| 3. For use with Cable | Ø1.5~Ø1.8mm |
| 4. Finishing Color | Nickel / Chrome / Satin Anodized Silver |
| 5. Functionality | Self-Gripping |
| 6. Safe Working Load | 20KG,depends on the cable diamter work with |
| 7. Advantages | * Safe, reliable and compliant * Time-saving * Simple one hand use without tools * Infinitely adjustable |
Application: Ceiling Mounted, Sloped Wall, Wall Mounted.
Rated Weight: 15 Kg - (Solid Structure) - 10 Kg (Drywall - Ceiling)
Note: Toggle Bolt Anchors are required in order to achieve max weight load when installed on drywall ceiling.
The products rated weight pertains to the hardware only. Actual carrying weight may vary based on both
installation and variable conditions of the structure.

This solo hanger offers a great solution for flexiblity with a minimum of installation needed.
Perfect to hang from a ceiling but also useful to hang on a small wall, columns, shop windows and steel ceilings.
It also offers the possibility to hang more than 1 object on the same cord to a total maximum of 15 kg per set.
A complete Solo hanger set consists of:mounting foot, closing cap, steel cable 1,8mm and a self-locking gripper.
This Solo-hanger comes without a plug or screw, which must be selected seperately.
Easy to use
A.Insert the cable into the gripper. Always insert the cable through the pin unless otherwise stated.
B.Adjust the gripper up. When you let go of the gripper it will automatically lock itself on the cable.
C.Press the pin and adjust down. When you press the pin the lock opens and the gripper slides freely
up and down the cable. Release the pin to lock the gripper again.
Caution
A. Direction of cable and gripper must be in a straight line.
B. The cable must be inserted all the way through the gripper and protrude at least 25 mm from bottom
C.The angle of the cable must be in the same direction as the gripper joint. Otherwise the joint may break.